Letter for Mimi 2 – wip #17

Letter for Mimi 2 menu fix

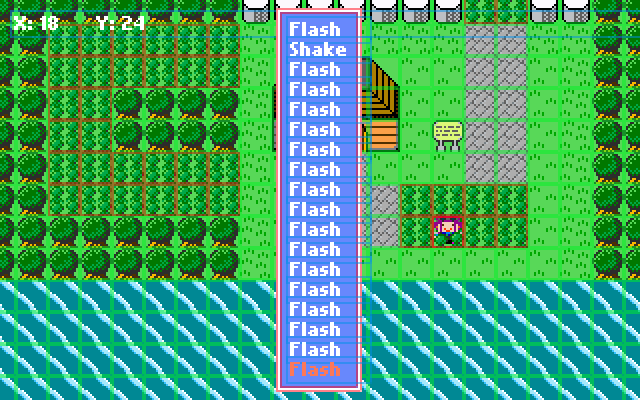
In my previous post I pointed out a bug in the menu structure. When revising the code I decided not to redo everything to allow for a scrolling type of window. At the moment no more than 18 items can be displayed at the same time. This should be sufficient for a simple game. In the screenshot above you can see the items menu with 18 items and showing the Flixel bounding boxes. All menu’s should now adapt their height an width to the amount of options inside of them.

Letter for Mimi 2 – wip #16

Letter for Mimi 2 menu

In the screenshot above you can see that I have added a ‘show coordinates’ option, this will display the current x and y position of the player in the top left corner of the screen. Having this in the production version might be useful for people who follow guides to find secrets in the game. By default the option will be disabled.

The menu structure was made last year. There is an offset which can easily be spotted: the menu has a tendency to expand upward when more items are added. In the previous games I made, the number of items was limited to a fixed number, due to the size of the screen. For this game I want to have an unlimited list of items possible (well, maybe less then MAX_INT). In the image below you can see what I want it to look like. When pressing up while in the item menu, it will scroll through the items in the inventory showing a small selection of items. In order to solve these issues, I might have to rewrite the menu system.

unlimited_menu_letter_for_mimi_2

Letter for Mimi 2 – wip #15

In the video above you can see how npcs can follow the player, in order to do this I have implemented the A star path finding algorithm. It is possible to talk to the person following you via the party option in the menu. This new feature will open new quest types, where you have to escort people to certain places. In the future it might also be used for a party system, where all party members follow the player in a conga line.

Letter for Mimi 2 – wip #14

I have changed the grass overlay so it is an extra layer on top of the background tiles. Before this, a sprite was continuously being updated to the position of a character. Both approaches worked, but the latter increased the number of calculations per frame, so it might decrease performance when a lot of characters are present. In the screenshot below you can also see another update: different sprites for NPCs.

letter for mimi 2 wip 14

Letter for Mimi 2 – wip #13

Today I fixed the checkItem event, it is now able to check if multiple items (even duplicates) are present in the inventory. The next line in the dialogue will be the line with id 6 if there are two Town Maps in the inventory and one Test item. If this condition is not met, the next line will be the line with id 2.

<line id="1">
    <text>#%Mimi:%# A #*Town Map*# can be really useful for adventurers!</text>
    <events>
        <event trueId="6" falseId="2" item="Town Map,Town Map,Test">checkItem</event>
    </events>
</line>

My plan for the next updates is to get the features in the engine to match those found in Kees Adventure: The Lost Chapter, and then release a game with this engine. I will then use the feedback on said game to integrate new features into the engine. Doing this will give me a good base to expand the game-engine in the future.

Letter for Mimi 2 – wip #12

In the video above you can see the latest feature: item trading, branching dialogue and the Town Map. The colours in the dialogue are how I imagined them to be, with blue indicating items here, pink the NPCs name and green the players name. The Town Map will still need some work done, the location of the player has to be read from the world data in the *.xml file. As an extra feature I might also add a cursor that will allow you to see the names of the roads and towns. I think this is an essential part, otherwise the map will just be a static image detailing no usable information.

Letter for Mimi 2 – wip #11

Dialogue now is able to contain events such as demonstrated in the video above: flash, shake and changing of tiles. The events can be easily extended, however they are hard coded into the game-engine. Multiple events can be added to a single dialogue line, as you can see in the XML representation of the conversation:

<line id="1">
    <text>#*Flash*# test</text>
    <events>
        <event>flash</event>
    </events>
</line>
<line id="2">
    <text>#*Shake*# test</text>
    <events>
        <event>quake</event>
    </events>
</line>
<line id="3">
    <text>#*changeTile*# test</text>
    <events>
        <event x="22" y="22" tile="5">changeTile</event>
    </events>
</line>

Letter for Mimi 2 – wip #10

Coloured text in Flixel

In the image above you can see coloured text in the dialogue, as many colours as you want can be implemented but for now there are only five (including white). Different colours can be used to indicate certain types of objects, such as items, people, events and places.

When entering the text in the *.xml file, you can specify a specific colour by having text between hash tags and a set of characters. For example, the code for blue is: #*blue text*#. When no colour is specified the default colour is used, which is white in this case. In the xml snippet below you can see what the unparsed text from the screenshot looks like.

<line id="2">
  <text>
    #%Kees:%# Can you try to bring this #*letter*# to #%prof. Mimi%#? 
    She lives in #@the village@#. You will need to pull the #$lever$# first to open the bridge!
    #$Green$# #@Orange@# #%Pink%#, #*Blue*#.
  </text>
</line>

Letter for Mimi 2 – wip #9

Non-playable-characters now look at the player when you are talking to them, in the video above you can see this as well as a general ‘npc’ that wanders around, which you can talk to. The speed-up moment quickly shows how far the npc can wander (this one is set with a radius of 2). In debug-mode the X and Y positions of the player are displayed in the top left corner.